This is a summary of the Restorative Inversions workshop I went to in October 2017. Sorry it's taken me so long to write it up...
What is restorative yoga?
It's a technique for relaxation. It's conscious deep rest. It uses props to support the body in a position of ease in order to create mental and physical equanimity. Restorative practice is 'still/dark/quiet/warm time', linked to RAS (the reticular activating system), which slows us down.
What are restorative inversions?
Inversions are defined as the head being lower than the heart, changing the orientation of the body to experience/manipulate a shift in the central nervous system.
When doing restorative inversions, you should be attempting to achieve 'optimal restful effort', but not strain yourself. Strain shifts the behaviour of the CNS into sympathetic (e.g. learning, engaging), while you want to use the parasympathetic section (governing the immune system, things you can't fix with external stimulation and stress).
What are the rewards of restorative inversions?
They should change how you feel mentally and emotionally, give you the reward of more oxygen, nutrients, reduction in heart rate and blood pressure. You can also enjoy more prana (masculine energy of achievement, chest upwards) and upana (female grounding energy).
Inversions can 'tone' organs through the lymphatic system being affected by gravity (it's a 'squeezing' of tissues, which is apparently a thing - I need to do more research into this!)
Not all inversions are created equal - active (e.g. headstand) vs receptive (savasana).
What are the risks of restorative inversions?
The risks are that restorative inversions are often new to people, putting weight on a part of the body that wasn't designed to bear weight, and can have an effect on blood pressure (so you need to be careful if you have any issues with this, increasing the modulation of the inversion over weeks/months if necessary. If you're just seeing them for one or two classes, keep it gentle).
People with hypermobility often have POTS (postural tachycardia syndrome). When they're in an inversion, they mustn't strain, and you must avoid hot rooms. You want them to be in relaxed effort mode. Same thing re working up into postures incrementally.
It's not a good idea to do restorative inversions if you are: menstruating (that old chestnut), have glaucoma (fairly enough, because it increases intra-ocular pressure), are pregnant, have a stuffy nose/cough, or a headache/migraine.
If you have spondyliosis, do NOT do supported bridge inversions.
For someone like me, who has weak back muscles and is hypermobile in the hips, try small doses for longer periods. Slowly up the amplitude - some bodies are not conducive to sudden movement.
It's a good idea to ask 'is there any condition I need to know about to help you in your practice today'?
How do I prepare for a restorative inversion?

1. Forward twist (left and right, over a bolster, hip pulling away)
2. Bolster under knees, blocks each side for hands, rest back, blanket under head
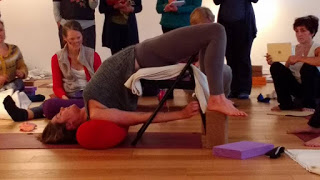
Supported bridge inversion
Supported bridge requires: two bolsters, blanket at top, blanket roughly rolled up and tied around knees - can use strap instead. Head hangs off back, gently move body backward until inverted.
You can add blankets if needed to reduce the space between the floor and the bolster. Your hands should go out onto the blocks at each side, or above your head, depending on how you feel. If your legs are slipping off the bolster, use extra. You want inward rotation of the legs, and to be still.
Most importantly, pay attention to your 'cooking time' - don't stay too long (as I did!). You can put an eye pillow on top enable peaceful rest.
To exit the pose, shift backwards onto the floor slowly, till your shoulders then pelvis are on the floor. Roll off/remove the blanket bind. Stay for a few breaths.
Importantly, take your time getting into this pose and don't be afraid to exit it if you experience discomfort. When you enter it, think about ironing out all the 'energetic creases' in your back to prevent twinges. And don't be afraid to use loads of blankets (if you're lucky enough to have them).
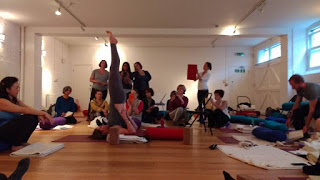
Viparita karani inversion (chair)
This version is chair-based. Best to use an iyengar chair if you have one. For taller people, you can always add blocks and blanket padding. This tends to require a friendly friend/teacher to help with positioning.
For the chair version:

First option: cover the chair in plenty of blankets for your comfort. Sit on the chair with your legs through the back. Lift your legs up and over the chair back. Slowly slide yourself down onto the bolster, which should be across the legs, very close to the chair. Your upper back will be on the bolster and your head will be on the floor - use blankets if you need. You can lift your legs into viparita karani from here.
Or, put your legs over the back of the chair and rest down onto strategically placed bricks either side of the chair legs. If your arms are long enough, you can grasp either the chair legs or your ankles (you can drop the bricks if this works for you). If your arms are short like mine, use a strap to help with this.

Second option: sit right at the back of the bolster (facing towards the chair, under it just a bit). Strap just below your knees to give you something with which to let go. Physics of weight will open your legs. You must make sure your back of knee is really supported.
Pull the bolster underneath you, and roll back so your head is just hanging off it (blanket underneath if necessary). You want C7 to be slightly lifted (the chunky bone thing just below your neck). You don't want to be so far you're in headstand, opening your ribs.
Drop your tailbone into the bolster. Put a blanket over your legs, then an eye bag. Rest. To come out, remove the bolster if you have no lower back issues, or wiggle your leg out of the strap and then gently roll yourself off.
For less mobile students, remove the bolster and give a blanket under the head.
Viparita karani inversion (wall)
This is hard for people with tight hamstrings. You need to sit next to a bolster (which is away from the wall), roll into the pose, strap legs, blanket under head. Your belly will be supported by the bolster, your bum is hanging a bit. Your tailbone should point downwards and you want to be in a backbend, avoiding compression. Sometimes it can feel like you don't want to open your lower belly - be brave.
If you have hyperextended knees, you can put a bolster by the wall, or blocks underneath the bolster, or a blanket over the feet (by the wall). Or even a sandbag on the feet. Remember that in the knee joint, we have the most stability and congruence when legs are straight.
Roll out of this one.
Shoulder stand
In flow classes, we ask people to flex beyond the capability of their cervical spine. To get to 90 degrees, we round our thoracic spine, losing the ability to free our lungs. Significant amount of support is needed to avoid 'neck stand'.
A more restorative option would be to begin against the wall, in a bridge-esque pose, and then move into the centre of the room with blankets. You can use 4 blocks, 4 blankets, roll over part of your mat. Keep your bolster lengthways.
NB this is still out of my reach!